Ask Your Builder This Question about Your Home’s Foundation

The pouring of the foundation is the first major milestone of a home-building project. It’s an exciting time, because it’s when you start to see your home take shape. You will begin to see the outline of rooms, and even visualize yourself living there. 

The foundation is an incredibly important part of any home-building project—for obvious reasons. It serves as your home’s major source of support, so it has to be done right. Before any concrete is ever poured, be sure to ask your builder this one question: Will you be using wire mesh? 

These days, most construction projects call for concrete to be poured with wire mesh that’s suspended during the pour. This allows for thinner slabs to be poured and can guard against future cracking, because it provides a structure for the concrete to hold on to and lessens the migration. On its own, concrete doesn’t have much resistance to tension, so adding wire mesh gives it more flexibility and strength. A home’s foundation must be extremely solid, but a little flexibility is essential. 

Before your foundation is laid, be sure to talk to your builder about how the concrete will be laid, and what type of concrete will be used. Too often, contractors cut corners. They might leave mesh on the ground for the inspection, but then roll it up and not actually use it for the pour. I have yet to see a foundation poured in this city that, at minimum, the wire stays on the ground during the pour. This is simply due to lazy workers not lifting the wire as the concrete is being poured, so that it is not suspended in the middle, thus losing any strength that it would have provided.
 

Another question to ask your new builder – Is your new home pad going to be Over X’d? And has your lot been tested to see how dense the soil is that you are about to put your new home on? A third-party company needs to be hired to drill 2 -4 holes into the earth, and see what’s under there. They will generate a report for you, letting you know exactly what needs to be done to compact the earth that is holding up your home. The dirt then needs to be compacted to those specifications. The company will guarantee your home if you follow those guidelines. They will come out and inspect the dirt contractor’s work every 12” of compaction, and insure the correct amount of water is being processed into the dirt going back into the pad. You cannot compact dirt over 12”. So, any contractor that dumps dirt on a lot as fill, spreads it out to lift the pad’s height, and runs a roller over it, is not compacting the pad. You will have problems, ranging from severe foundation shifting, to stucco cracks, or wall cracking. 

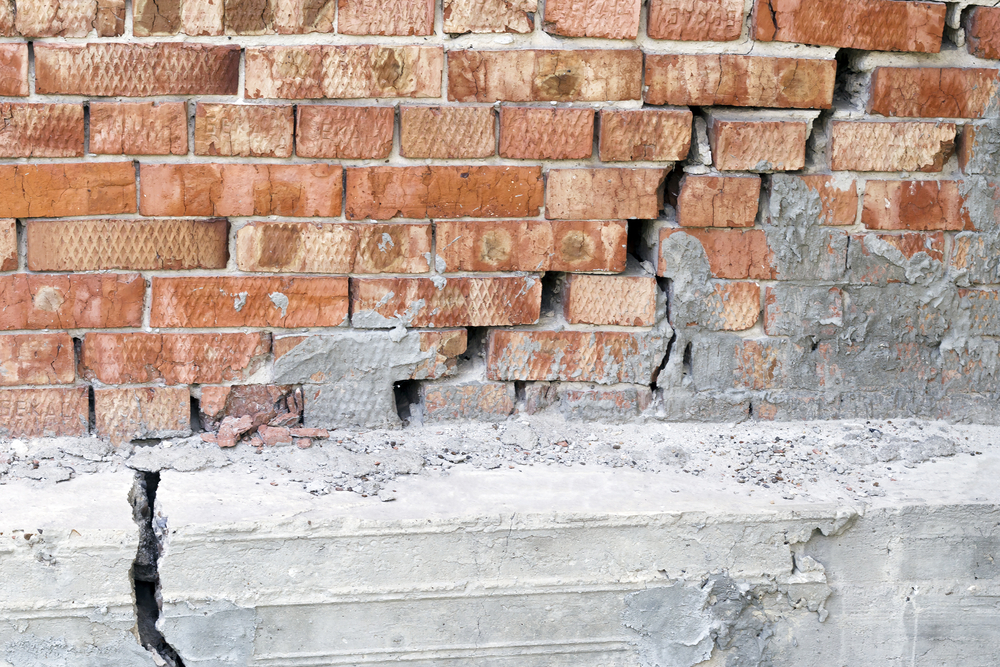
Once you have your pad excavated properly, and you have your new pad completely trenched out, and have the internal plumbing installed in the ground, you need to have those trenches compacted properly. Remember, you cannot compact over 12”. Make sure that those trenches are back filled at 12” depth, and run a compactor over it to compact it again before another 12” of dirt is added. Remember that this needs to be processed dirt – not dry dirt. To reach proper compaction, it must have water added to limit any air pockets. The third party will density test these trenches before they will certify the pad and warranty. You can easily identify when a wet pack, and proper compaction of these trenches, has not occurred, as there will be cracks in your newly poured concrete along the plumbing lines. This cracking will continue as the house settles, and transfer to your floor covering. 

As owner of John Mark Custom Homes, I always stay on-site while the concrete is being poured. I also help hold up the mesh during pouring, to ensure that it stays in the right place throughout the process. We also use a true concrete, without added fillers like fly ash, so that it functions as it should – without large cracks. 

At John Mark Custom Homes, we take pride in educating our home builders every step of the way.


Back to ‘Custom Home Tips’

Tips on Choosing Which Insulation for Your Home

Insulation is one of the most important elements of your home that you’ll probably never actually see. It lives between your walls and ceilings, and can affect many things: ventilation, air sealing, sound, and energy efficiency.  

When you’re building a home, you have so many decisions to make. Before choosing insulation, you need to consider its longevity and quality. There are three main types of insulation that homeowners have to choose from, and each has its own unique features.  

  1. Cellulose 

Cellulose is an eco-friendly approach to insulation. It is made of 80% post-consumer recycled newsprint, and the fiber is chemically treated with nontoxic borate compounds, so that it is resistant to fire, insects, and mold. Overall, cellulose is efficient, nontoxic, and affordable. However, in New Mexico, a national supplier came here several years ago and drove the price down so low they made their competitors unable to compete with cellulose. They were able to do this because they had massive volume breaks nationally, and the local guys did not have that buying power. Once they dominated the market in cellulose, they raised their pricing, and the local companies choose not to go down that road again, causing the cost to be artificially inflated. Although this would be the preferred insulation method overall, it is cost prohibitive for most new construction.  

Even though cellulose insulation is made of paper, it’s considered to be more fire resistant than other types of insulation, because of the chemical treatment and the fact that cellulose fibers are more tightly packed. This also makes it more resistant to air leaks. This type of insulation can be installed by blowing or spraying. Cellulose can be applied wet or dry. Wet is messy, and blown in like papier mache, and then shaved backed to the studs. The extra material that doesn’t stick inside the walls gets put back into the hopper and re-shot in the walls – so there is very little waste.  

  1. Blown-in fiber 

Loose-fill insulation is blown into walls using a power blower. This method of installing insulation works well in renovations when you don’t want to remove all of the sheetrock, because it can easily fit around obstructions such as wiring and pipes. To install blown-in insulation, technicians drill holes in the ceiling and fill in the walls with fiber. It is a tighter pack, and provides a higher R-Value than fiber glass rolls, as it can be manipulated around plumbing.  

When used in new construction, netting is stapled along the studs and blown into the walls starting at the bottom, and is then blown into the wall cavity between the studs and netting. Make sure your contractor is present, to ensure that the cavity is completely filled and tight. It is important to make sure the cavity is tight but not overly blown, as installing the drywall will result in nails and screws popping out of the walls, and the drywall tape migrating, causing visible seams or cracking years later.  

  1. Fiberglass rolls 

Long strips or rolls of fiberglass insulation are another option for homeowners. This type of insulation is perfect for new projects, or extreme renovations where the walls are torn out. Because large pieces of insulation are rolled out and carefully placed in the walls or ceilings, it’s a much neater technique than blown-in insulation, and offers high levels of fire and heat resistance and air tightness.  

Note: How to determine your R-Value in walls and Ceiling  

To determine your R-Value for blown in fiber, multiply the depth of the area (ceiling or wall) by 3.1-3.4. The range is due to how compact the fiber is applied. The walls can be compacted at a 3.4 density, but the ceiling is blown in loose, so a more accurate multiplier would be 3.1. So, a 2×6 stud exterior wall would have an R-value of 3.4×6” – an R-Value of 20.4. Most installers round up and state 21. If your builder says a higher R-value can be achieved, remember that can only happen if the walls (depth) is greater. It is unusual to have a 2×8 exterior wall.  

Another very important consideration is the foam insulation used to seal all penetrations around the windows, doors, walls, and floor before insulation is installed. Inspectors only are looking for windows and exterior doors, so make sure your builder is present to insure the penetrations, such as gas lines, water values, vents, etc., are foamed as well. This not only stops air penetration, but also helps prevent critters from entering your new home.  

Building a new home can be overwhelming, with so many decisions to be made. At John Mark Custom Homes, we take pride in educating our home builders every step of the way.  


Back to Custom Home Tips

Aging in Place

The huge Baby Boomer generation is now well into middle age, and either entering retirement or already retired. The majority of Boomers are determined to remain in their own homes, which means that aging in place has become an emerging trend. But aging in place is not just about comfort, it also allows homeowners to maintain their independence and comfort in their own homes as their physical needs and capabilities change.   

Aging in place home designs use the principles of universal design, eliminating barriers to access, and providing a safe, easy to use environment for people of all ages and abilities. The idea is to build a home whose design is flexible and can easily adapt to accommodate life changes, creating an environment where all ages and ability levels can live comfortably, easily, and safely.   

Aging in Place – New Construction 
Integrating aging in place accommodations is easier with new construction, precisely because accommodations can be included in the planning phase.  Many residences designed to facilitate aging in place are single-story homes with a stepless entryway, eliminating the need to install exterior ramps or interior stair lifts. New construction should also allow for generous walkways throughout the home, including doorways measuring at least 36 inches wide, to accommodate a walker or wheelchair. Sufficient lighting should also be available throughout the residence.   

In the bathroom, a curbless shower is a worthwhile aging in place investment, along with blocking, to allow for grab bars to be installed when needed.   

In the kitchen, the idea is convenience and comfort. Install flooring that is easier to stand on for long periods, such as vinyl, linoleum, wood, or cork. Consider adding seated work spaces. Look at installing lever-handled faucets, and appliances with D-shaped handles that make it easy for people of all abilities to open and close cabinets. Contrasting color edges on countertops can help those with vision problems to easily see the edge of the countertops.   

Aging in Place – Renovation and Retrofitting
Retrofitting a home to accommodate aging in place can vary in cost depending on what type of work you need to have done in order to make the home more easily usable for everyone. But there are some easy changes that can be made to help make your existing home one where aging in place is possible.  

The bathroom is one of the best places to make changes in order to make aging in place easier. Things such as replacing the bathtub with a curbless shower with a bench, and installing grab bars, can make it easier for people with difficulties with balance or walking to easily enter and use. Expanding the doorways to 36” to accommodate a wheelchair or walker means that family members can more easily access the room without needing assistance.   

Installing hardwood floors throughout the house can eliminate fall risks from tripping on rugs, while also making it easier for walkers and wheelchairs to be used.   

Creating a stepless entry into your home can be as easy as installing a ramp to ensure easy access from the driveway or street.   

Brighter, and more, lighting throughout the house makes it easier for everyone to see what they’re doing and where they’re going, which can help reduce the risk of accidents and falls. Ensure that accessible switches are in place at both ends of hallways and staircases, so that nobody has to cross a space in order to turn on a light.   

Making a few key design changes, during either the build or remodel process, can not only make it easier for you to age in place in your own home, but to create an open and accessible space that is easily enjoyed and used by everyone in the family.   

For more information about aging in place, and the construction accommodations that can make it possible for seniors to remain in their homes, give us a call.  We’ll be happy to answer whatever questions you may have.

Back to Custom Home Tips

Turning Your Home into a Smart Home

During the 1960s, George Jetson, his wife Jane, daughter Judy and son Elroy lived in a futuristic space pod where everything was automated. Today, that cartoon scenario is closer to reality than ever. You may not be able to live exactly like the Jetsons, but it is possible to automate and regulate quite a bit, operating lighting, appliances and even housecleaning from your smartphone or with a simple verbal command. The cost is less than you might imagine, with the additional benefit of reducing your household’s carbon footprint.

Smart Lighting
Smart lighting results in lower electric bills and is also environmentally friendly. Smart lighting can be configured to monitor energy usage, to turn itself on and off on a set schedule or to turn lights off in rooms that are not being used, translating into significant utility bill savings. Smart lighting systems can also incorporate colored bulbs or connect to a dimmer for mood lighting.

Smart Heating and Cooling
Anyone who has experienced sticker shock from a sky-high electric bill due to heating in the winter or air conditioning during the summer will appreciate the benefits of smart heating and cooling. Smart meters allow users to monitor and regulate electric usage, scheduling high-demand tasks such as laundry for non-peak periods. Smart meters also regulate heating and cooling systems, scheduling systems to run for the minimum time needed to maintain reasonable indoor comfort. Smart heating and cooling systems can also regulate thermostats on a schedule so that less heating and cooling energy is used at night.

Smart Cleaning
Smart cleaning robots are definitely fun. They can be set to clean up sudden messes and to run on a schedule to keep all the floors in your home clean, allowing homeowners to spend time doing other things. Smart cleaning robots “sense” obstacles such as furniture and avoid them. They also plug themselves in when they need to be recharged.

Smart Switches
Automated electrical controls are not new. However, smart switches remove the function of turning electrical items on and off from the realm of novelty items like The Clapper. These sophisticated controls allow users to schedule and monitor usage of anything plugged into them from a laptop computer or a mobile app. The payoff comes in the form of energy savings as well as lower utility bills.

Voice Activated Assistance
Voice activated systems such as Amazon Echo or Google Home use technology similar to virtual assistants such as Apple’s Siri. However, services like Amazon Echo or Google Home can do far more than smartphone-based assistants. These services can control a user’s lighting and thermostats, make phone calls or control an entire security system.

Back to Custom Home Tips

Track the Day to Day Progress of Your Custom Home with Sapphire Software

At John Mark Custom Homes, we take the saying “your home is your castle” to heart. We pride ourselves on building custom homes precisely to our clients’ preferences and specifications. One way we accomplish this goal is by providing our clients with day-to-day updates on every phase of the home construction process.

Sapphire Viewer
As a home builder, I understand all the intricate aspects of construction – reading blueprints, selecting building materials, dealing with home inspections, etc. That’s not the same for most of our clients. They just want their house built right. At the same time they sweat the details, which is understandable. After all, it’s their home.

At John Mark Custom Homes, we have solved this dilemma by adding a layer of transparency to the home building process. We use a free software tool called Sapphire Viewer that we share with our homeowner clients. With Sapphire Viewer, homeowners can literally see the nuts and bolts involved with the construction of their homes – as their homes are being constructed.

Sapphire Viewer translates the engineer’s specifications into a 3-D Illustration of the structure that includes each board – and precisely where it fits. With Sapphire Viewer, our framers and builders know exactly how many beams are needed under a loaded girder and precisely how a truss hangs, eliminating the need for guesswork.

Homeowners can install Sapphire Viewer software on their home computers and mobile devices so that they can be assured that their home is being built right. The software uses GPS, which allows users to “walk “through the home and identify every truss inside the structure. With Sapphire Viewer, homeowners can be reassured that their homes are being constructed to adhere to precise engineered specifications.

Transparency
Sapphire Viewer software is just one example of the transparency that is integral to the way that John Mark Custom Homes does business. To learn more about Sapphire Viewer and how this valuable tool fits into our home building process, check out our website, or give us a call today.

Back to Custom Home Tips